Making demonstrations
Check boxes
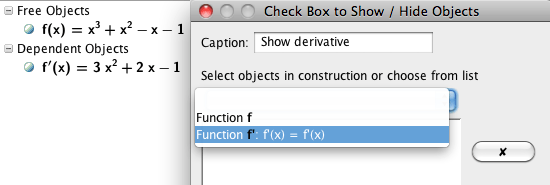
When using constructions as demonstrations, you can use check boxes ![]() to show or hide objects. The objects you choose in the drop-down list,
will only be shown when the box is checked.
to show or hide objects. The objects you choose in the drop-down list,
will only be shown when the box is checked.
Conditions in GeoGebra
In order to make a selective statement as in "show this item when this condition is true", you must use logical conditions, i.e conditions that are either true or false. One condition that is often used is comparison between numbers. You compare numbers in GeoGebra by using following code:
<, >, <=, >=stand for <, >, ≤ and ≥ respectively-
==, !=stand for "equal to" and "not equal to", note that a single = is not testing a logical equality &&and||stand for logical and (\(\wedge \)), and logical or (\(\vee\)) respectively.
Using a slider to turn an object on/off
If you want to show the steps of a construction in a more advanced manner than just using the construction protocol, you can use a slider to represent the steps you want to show. You can find an example of a slider used for representing the steps here (Fundamental Theorem of Calculus)
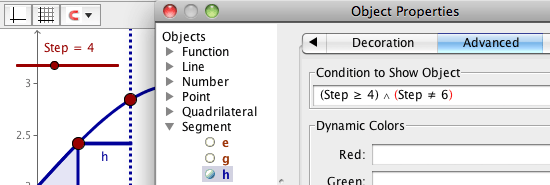
To choose the steps when an object is to be shown, you pick the advanced tab in the properties window. In the picture below, this code has been entered:
(Step>=4) && (Step!=6)
GeoGebra formats the text of >=,
&& and !=, as seen in the picture.
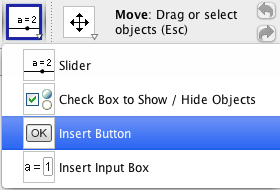
Insert Input Box
In GeoGebra 4 there are two new tools, Insert Button and Insert Input Box.
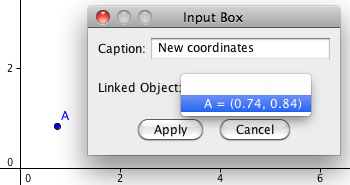
When using the Input Box, you first make an object, then you link that object to an Input Box. The user will be able to change the value of the linked object. The text entered should follow the GeoGebra syntax, i.e. the syntax used when entering objects in the Input Bar. An example of an Input Box for a function is shown at GeoGebra Tutorial - Functions.
Insert Button
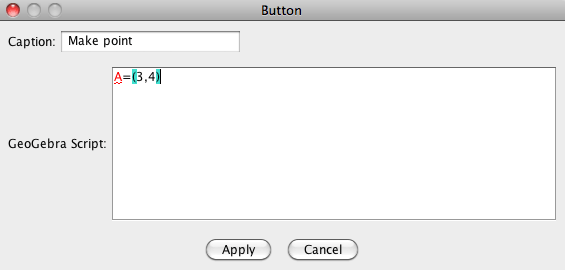
When inserting a Button, a box for entering a GeoGebra script is shown. Enter the code
A=(3,4) in the script box. When clicking the button "Make point", this is the
code that is executed.
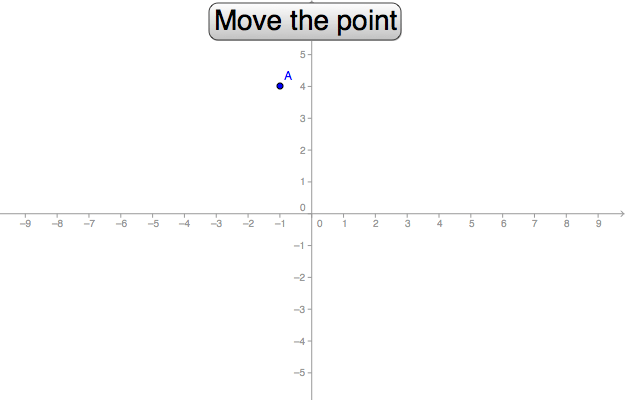
When clicking the button the first time, the point A is created. When clicking the button again, the point A gets the coordinates (3, 4); i.e. nothing happens.
You can change the coordinates of A to random numbers by using the command:
RandomBetween[<Minimum Integer>, <Maximum Integer>]
Open the properties window for the button, choose the Scripting tab and On Click. Then change the coordinates to random numbers.

The command SetValue
Every time you click on a button with the "On Click" event
A=(RandomBetween[-5,5],RandomBetween[-5,5])
the point A is created. The effect of the code though, is that the same point A gets new random coordinates. If you just
want to change the value of an existing object, it is more efficent from a programming point of view to use the command
SetValue.
In the worksheet above, the point A already exists before clicking on the button for the first time. The "On Click" script of the button is:
SetValue[A,(RandomBetween[-5,5],RandomBetween[-5,5])]
The command Execute
If you want to make a new point each time the button is clicked, you need a way to make a new variable name.
If the variables should be named A1, A2, A3, ...; the index can be
stored in a variable that is incremented each time the button is clicked. The problem is that you must be able to
mix strings with variable values. The command Execute provides a means to do that.
Execute takes a list of strings that are interpreted as commands and executes them.
Execute[{"command1","command2","command3"}]
In order to mix a string with the value of a variable, you enclose the string with " characters and concatenate it with the variable using the + character. The string should hence be:
"A_{"+i+"}=(RandomBetween[-5,5],RandomBetween[-5,5])"
where i is the variable to be incremented.
To execute this string as a command and increment the variable i, first create a variable i with the value 0, then write this as the "On Click" script for the button.
	i=i+1
	Execute[{"A_{"+i+"}=(RandomBetween[-5,5],RandomBetween[-5,5])"}]
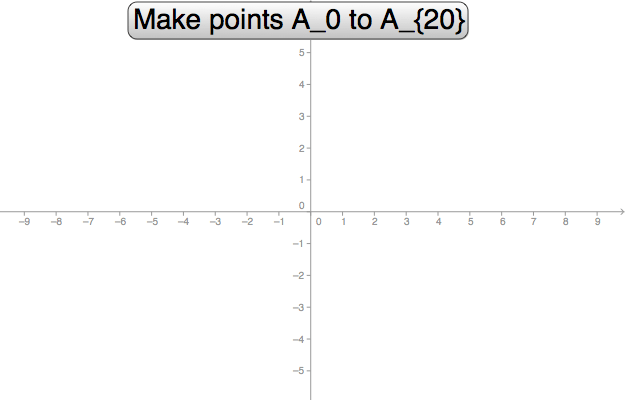
In the worksheet above, the values of i are restricted to 0 to 20 by using the mod-function:
	i=Mod[i+1,21]
	Execute[{"A_{"+i+"}=(RandomBetween[-5,5],RandomBetween[-5,5])"}]
by Malin Christersson under a Creative Commons Attribution-Noncommercial-Share Alike 2.5 Sweden License